Thursday, December 9, 2010

Get Quick heal Internet security just @ RS 199/-


yes ! it is true. you can get Quick Heal Internet security only at   Indian rupee 199/- . why we depend on trial version when full version is available at low price? . If u are using Genuine Microsoft OS then it is good news for you 
you can check whether your copy of OS is genuine or not just by a key press..

Press win+pause or point to my computers --> properties . At the end of page, you will find logo as shown below if you are using genuine OS. Below that logo you can see a link saying  "Learn more online..." .


Microsoft Windows 7 Home Premiumclick on that link you will be navigated to the validation page
There click on the tab " validate"  tab. Then click on the button
saying validate windows. you can also validate your office over there.


A Microsoft's validation tool will validate your OS. Wait for some time.


 If you are using Genuine copy of OS then you will see a message like "windows validation was successful". 


Till now you are validated your product. Now you can navigate to offer page..


click on the link "get extras". 
Now you entered into the main offer page. 
There you are eligible for all the Featured offers of Microsoft. To get Quick heal product and other products click that second link and order the product...


NOTE: OFFERS VARIES BASED ON COUNTRY. 
ENJOY THE QUICK HEAL INTERNET SECURITY WITH LOW PRICE. BE SECURED. 


DON'T FORGET TO SUBSCRIBE TO TRICKS HEAVEN. IT WOULD BE HONOR TO US.

Share/Bookmark

Wednesday, December 8, 2010

How to save a document (.doc) as PDF or XPS in office 2007

Microsoft's new office 2010 released with a bundle of added features to office 2007. The compatibility is there that a document which is edited in office 2007 can be saved as office 97-2003 document so that it can be opened in office 98 or 2003.


But by default there is no option is provided in office 2007 that to save a document in a .pdf format. To get that option we need to install extra plug-in. which is later released by Microsoft called

You can download that plug in from here: SaveAsPDFandXPS.


Just it is a 934 KB. plug in. simply download and install then open office 2007. you will see a extra option is added in save as options menu. 
That's it.. now you can save a document to a .pdf or .xps format.


Don't forget to subscribe TRICKS HEAVEN. It would be a honor to us.

Share/Bookmark

Tuesday, December 7, 2010

How to delete product key from registry in windows 7


     You might be knowing that there are plenty of softwares available to find the product key of windows OS like Windows key finder , LicenceCrawler etc..which find the product key in less than a second.

 First backup your key  then it is a good idea to remove your product key from registry when you are sharing your pc with others, or some one may not find it using softwares mentioned earlier and mis use it.. or if you want to hide your key form other.. 

If you want to do so , then follow the simple steps, you can delete the product key just by using a command.

Open command prompt with admin rights, to do so navigate to command prompt in accessories and right click and choose "Run as administrator" or short cut is type CMD in start menu search bar and hit  Ctrl+Shift+Enter.


Then in command prompt type the following command and hit enter
slmgr -cpky

Wait for some time, you will see a message saying " product key from registry cleared successfully" 


YOU ARE DONE. 

Share/Bookmark

Friday, November 26, 2010

Hostgator black friday 2010 discount offer : 80% max

We know about Hostgator black Friday sale and  Hostgator has revealed It’s blackhostgatorlogo thumb Friday deal. Surprisingly this time they don’t have any discount coupon and you will be getting flat 50% or flat 80% off depending on the time you register.

Grab Hostgator black Friday Hosting now


Here is Hostgator Black Friday Sale offer:


  • 50% OFF EVERYTHING From 12:00AM CST to 5AM CST


  • 80% OFF EVERYTHING From 5AM to 9AM CST WHILE SUPPLIES LAST (first come, first receive; so definitely don’t miss out!)


  • From 9AM to 11:59PM CST OR after 80% OFF accounts have sold out, we will continue to offer 50% OFF EVERYTHING


  • This applies to ALL Accounts and ALL Term Lengths. So you’re visitors and friends will have the opportunity to receive up to 80% off of up to 3 years worth of Hosting! That would come out to $35.64 for 3 FULL YEARS!


    In short you will be paying :

    Shared Hosting: 0.99 $ /month

    Resellor Hosting: 4.99$ /month

    VPS Hosting : 3.99$ / first month

    Dedicated Hosting : 34.80$/ for first month


    The sad news is that, we can’t book VPS and Dedicated hosting for more than one month. So only good offer which we have is to grab shared hosting or reseller hosting for longer period.

    To let you know Hostgator offers unlimited hosting. So this is the offer you ever get in this year don't miss it..

    please check your local time and buy accordingly.

    Grab the Hostgator's discount hosting offer

    If you have any question about this huge hostgator black Friday discount. Feel free to ask via Comments.
    Time Difference for Indian:
    • CST: -5 GMT
    • IST: +5.30 GMT
    So in India, this offer would start at 10.30 AM (IST).


    Share/Bookmark

    Tuesday, November 23, 2010

    sixth sense technology

    Pranav Mistry a MIT grad student from india is the genius behind 'sixth sense', which is the hot topic and latest technology. Sixth sense is the wearable device which allows to map physical world with the world of data. Which consists of a camera, small projector, a piece of open source software all this looks like a wearable pendent which is connected to a smart phone and expected cost is only $350..


    This Sixth Sense device can turn any surface into touch. A camera in this device can understand our gestures, and converts into computer understandable commands..isn't this amazing...!


    i don't want to talk much..i m giving chance to pranav to explain about his device... see below video...!


    Don't forget to subscribe us ...

    videos found on TED


    Share/Bookmark

    Sunday, November 21, 2010

    listen song from youtube with out launching browser

           While i was working with my document i thought of listening songs . I searched for my favorite song on my local drive, but it wasn't neither in my i-tunes library or on my disk. I was not interested at that time on launching browser,opening youtube or any and playing song.
    I got a doubt that can't we play any song from youtube with out launching browser?

    I searched for that and found a solution, that yes we can listen to our favorite songs from youtube with out launching browser. That which made me possible is QUISPLE.

    Download Quisple
    or visit: www.snapfiles.com

    Download Quisplewhich is freeware.

    Install it , type your song with title, hit enter, that's it.. it will play song directly from youtube with out launching browser.


    Share/Bookmark

    Wednesday, November 10, 2010

    How to rename default "new folder"

    Rename the Default "New Folder" Name When you click on the right-button to create a new folder. The Folder is automatically named "New Folder".
    Why Can't we change it to "My Folder" or "my stuff" or whatever name?

    I searched it, it took 2hrs until I found the best answer:

    Go to Google, and search for "Resource Hacker"
    Run the program and open Shell32.dll in "X:\Windows\System32\" ,where X refers to your System Drive.

    Navigate to: Strings\ 1896\ 1030

    You will find in the right pane ?New Folder?. Change it to "Confidential" or "Harry", whatever you like!

    Choose "Compile Script" from the Menu. Save it as shell32.dll in the desktop, but beware of saving it in "X:\Windows\System32\"

    Go to Google, and search for "Replacer"
    Run the program, drag Shell32.dll in "X:\Windows\System32 \" and drop it on Replacer's window, then press enter.

    Drag the Shell32.dll that you saved in the desktop and drop it on "Replacer's" window and press enter.
    The Replacer will prompt you to agree, press y then press enter.

    Restart your computer to see changes.

    All Done!

    I found that solution at "riteshhowto.wordpress.com"
    The article title was: "Rename New Folder."


    Share/Bookmark

    Sunday, October 31, 2010

    How to remove Windows Genuine notice in windows 7

    If your windows 7 not licensed it is very common that you get WGA warning also called as "microsoft genuine notification" or "genuine warning"  in your system tray. If this your system is inserted with this notice your windows 7 screen will be blocked but WGA tray message.

    How to detect whether your system is inserted by WGA notice??

    • you can see a small icon/notic which show the message saying "you may be victim of software counterfeiting this copy of windows did not pass windows genuine validation".
    • and your screen will be suspended.
    • a process called "wgatray.exe" will be running in task manager.
    Then how to remove this warning? in xp we can remove it just by doing some registry modifications, if you want click here. Then how to do this in windows 7 ? here we got a tool that will permanently remove WGA warning called REMOVE WAT. which was developed by Hazar.


    download Remove WAT OR  http://mods.myftp.org/Tools/Hazar/RemoveWAT.rar


    After downloading the this tool, copy it to the C: disk and before launching you must have Administrator rights. After patching your system by clicking remove WAT, restart and you are done...! HAPPY ??


    Note: we don't support using pirated softwares. Using pirates is a crime. This is only for Educational purpose only.
    Share/Bookmark

    How to remove Windows Genuine notice in xp

    Have you ever updated your copy of windows? then you might also come to know that what is 'Genuine validation'. It is a technique used by Microsoft to detect it's Genuine products, provide better services and eliminate piracy. 


    you might be wondering if you are using the pirated copy of windows OS, and trying to update your product then a tool will be installed to validate whether  the OS you are using is Genuine or not. If not it will show a notice in your system tray, and you might be annoying by seeing that message. It is something like "This copy of Windows is not Genuine you might be victim of software counterfeiting". The screen seems like below in xp.


    This happens because of two actions...!
    • One is by Automatic Updates. If your connected to internet and your windows Automatic updates are on. 
    • second  if automatic updates are off, but you trying to update manually. 
    Here I m showing how to get rid off this notice.


    Note: Please note that , by removing this notice your copy of OS won't become Genuine but only you get rid off the message.


                    If this Genuine notice is displayed in your tray means, a process called wgatray.exe  will be  running in your tray to  promt you continuously. If you are successful in removing that , think you are done..! 


    Here is simple and strait forward method.


    1. launch windows task manager by pressing ctrl+alt+del.
    2. End wgatray.exe process in Task Manager. To end it right click on the process and choose 'end process'.
    3. Restart xp in safe mode. To start xp in safe mode restart xp and press F8.
    4. Delete WgaTray.exe from c:\Windows\System32.
    5. Delete WgaTray.exe from c:\Windows\System32\dllcache.                                                              you are almost done..! you need to edit your Registry to remove it completely.    
    1. To edit registry, press win+R or choose Run from start menu, and type 'regedit' and hit enter.  and browse : HKEY_LOCAL_MACHINE\SOFTWARE\Microsoft\
      Windows NT\CurrentVersion\Winlogon\Notify.
    2. Delete the folder ‘WgaLogon’ and all its contents.
    3. Reboot xp. you are done...!!!
    Note: we "tricksheave"don't support using pirated products. This is only for education purpose only.


    Share/Bookmark

    Sunday, October 24, 2010

    Unable to boot system due to severe virus attack.. solved...!

                Due to the technological civilization and rapid groth of internet, using the internet became part of our day to day activity. With the same speed the virus attacks also increased to hack into our pc . I don't fear to say with loud voice that No anti virus can give 100% security to your pc in protecting against virus or malicious stuff.
               To protect your self and not to be a victim of these viruses you must install strong anti-virus on your pc. Due to some severe virus attacks, your may not even able to boot your pc. Because virus may reside in boot sector.
    In such situation , you need to scan your pc using any "Bootable anti-virus" which runs right before your OS starts loading.

    How to Get rid off:
    To solve this problems, Kaspersky is providing a Bootable Anti-virus software called "Kaspersky Rescue Disk 10"  for free. 

    To download free ISO file of Kaspersky Rescue Disk click here.

    Download Rescue disk (ISO file) from above link and write it to a empty disk.
    To fix your problem just boot your system with that disk....the software will scan your system and remove the virus which are stopping you to start your system.

    Instead of writing ISO file to a disk you can make your USB disk as bootable Rescue Disk.

    How to make Bootable Kaspersky USB Rescue Disk???

    1.   You can use your usb Rescue Disk to scan your system.To do so all you need to do is just download a "Kaspersky USB Rescue Disk Manager" from here and install it.


    2. After you installed, browse the path of already downloaded "Kaspersky Rescue Disk 10" 
    3. After specifying the path, you need to choose medium in which you are using to install this ISO. connect your USB and select it.(note: use only  FAT 16, FAT 32 formatted USBs)
    4. Then press START button. you are done...!

    Connect it to the system which is unable to boot due to severe virus attack, and restart it you are done...!

    Download "Kaspersky REscue Disk 10"
    Download "kaspersky USB Rescue Disk Manger"


    Share/Bookmark

    How to create bootable Kaspersky rescue disk10 (cd/USB)

                Due to the technological civilization and rapid groth of internet, using the internet became part of our day to day activity. With the same speed the virus attacks also increased to hack into our pc . I don't fear to say with loud voice that No anti virus can give 100% security to your pc in protecting against virus or malicious stuff.
               To protect your self and not to be a victim of these viruses you must install strong anti-virus on your pc. Due to some severe virus attacks, your may not even able to boot your pc. Because virus may reside in boot sector.
    In such situation , you need to scan your pc using any "Bootable anti-virus" which runs right before your OS starts loading.

    How to Get rid off:
    To solve this problems, Kaspersky is providing a Bootable Anti-virus software called "Kaspersky Rescue Disk 10"  for free. 

    To download free ISO file of Kaspersky Rescue Disk click here.

    Download Rescue disk (ISO file) from above link and write it to a empty disk.
    To fix your problem just boot your system with that disk....the software will scan your system and remove the virus which are stopping you to start your system.

    Instead of writing ISO file to a disk you can make your USB disk as bootable Rescue Disk.

    How to make Bootable Kaspersky USB Rescue Disk???

    1.   You can use your usb Rescue Disk to scan your system.To do so all you need to do is just download a "Kaspersky USB Rescue Disk Manager" from here and install it.


    2. After you installed, browse the path of already downloaded "Kaspersky Rescue Disk 10" 
    3. After specifying the path, you need to choose medium in which you are using to install this ISO. connect your USB and select it.(note: use only  FAT 16, FAT 32 formatted USBs)
    4. Then press START button. you are done...!

    Connect it to the system which is unable to boot due to severe virus attack, and restart it you are done...!

    Download "Kaspersky REscue Disk 10"
    Download "kaspersky USB Rescue Disk Manger"
    Share/Bookmark

    Windows media player all short cut keys

    Short cut keys are shortcut ways to do operations. Instead of using mouse every time by using short cut keys our work will be done faster and it is good to make habit of using short cut keys .
    I already listed earlier all short cut keys for control panel tools . Here i placed all short cut keys of using Windows Media Player. It may be difficult to use these keys initially, but once you come to familiar you can control Media player quickly...!

    Shortcut keys and its action

    1. Accessing the menus
    ALT+F To Go media player File Menu
    ALT+P To Go media player Play Menu
    ALT+F4  To close media player
    ALT+V To Go  media player View Menu
    ALT+T To Go media player Tools Menu


    2. Video Playback
    ALT+1  Set zoom to 50%
    ALT+2  Set zoom to 100%
    ALT+3  Set zoom to 200%
    ALT+ENTER  Full mode Displays of video

    3. Player controls
    ENTER or SPACEBAR Use to play an item
    CTRL+B Use to play the previous item in media player
    CTRL+F Use to play the next item in media player
    CTRL+E Use to Eject CD or DVD from CD or DVD drive
    CTRL+P Use to Play or Pause the item in media player
    CTRL+T Use to Repeat the items in media player
    CTRL+SHIFT+B Use to Rewind a file in media player
    CTRL+SHIFT+F Use to Fast Forward a file in media player
    CTRL+SHIFT+S Use to play items slower than a normal speed
    CTRL+SHIFT+ G Use to play items faster than a normal speed
    CTRL+SHIFT+ N Use to play items at normal speed in media player
    F8 Use to mute the volume in media player
    F9 Use to decrease the volume in media player
    F10 Use to increase the volume in media player

    4. Switching between display mode
    CTRL+1 Display media player in full mode
    CTRL+2 Display media player in skin mode

    Share/Bookmark

    ALL CONTROL PALNEL COMMANDS

    We can run Control Panel tools by typing commands in run. Here is the list of all control panel tools commands. type these commands in
    start --> run.
    Eg: for Accessibility Options type command "access.cpl" (with out " ") and hit enter.
    NOTE: If you want to run a command from a command prompt, you must do so from the Windows folder. Also, note that your computer may not have all of the tools listed in this article, as your Windows installation may not include all of these components. 
    Control panel toolCommand
    Accessibility Optionsaccess.cpl
    add New Hardwaresysdm.cpl
    Add/Remove Programsappwiz.cpl
    Date/Time Propertiestimedate.cpl
    Display Propertiesdesk.cpl
    FindFastfindfast.cpl
    Fonts Folderfonts
    Internet Propertiesinetcpl.cpl
    Joystick Propertiesjoy.cpl
    Keyboard Propertiesmain.cpl keyboard
    Microsoft Exchangemlcfg32.cpl
    (or Windows Messaging)
    Microsoft Mail Post Officewgpocpl.cpl
    Modem Propertiesmodem.cpl
    Mouse Propertiesmain.cpl
    Multimedia Propertiesmmsys.cpl
    Network Propertiesnetcpl.cpl
    Password Propertiespassword.cpl
    PC Cardmain.cpl pc card (PCMCIA)
    Power Management (Windows 95)main.cpl power
    Power Management (Windows 98)powercfg.cpl
    Printers Folderprinters
    Regional Settingsintl.cpl
    Scanners and Camerassticpl.cpl
    Sound Propertiesmmsys.cpl sounds
    System Propertiessysdm.cpl

    Share/Bookmark

    How to disable Windows xp boot screen

    We can disable windows xp boot splash screen, so that the overall boot time will be reduced a bit. just by adding a line to boot.ini can disable the xp boot splash screen. a simple boot.ini file in xp looks like exactly as below...


    Sample Boot.ini File:

    This is a sample of a default Boot.ini file from a Windows XP Professional computer.
    [boot loader]
    timeout=30
    default=multi(0)disk(0)rdisk(0)partition(1)\WINDOWS
    [operating systems]
    multi(0)disk(0)rdisk(0)partition(1)\WINDOWS="Microsoft Windows XP Professional" /fastdetect 
    • Edit boot.ini.

    • Add ” /noguiboot” right after “/fastdetect”.


    •  
    Edited Boot.ini File:
    [boot loader]
    timeout=30
    default=multi(0)disk(0)rdisk(0)partition(1)\WINDOWS
    [operating systems]
    multi(0)disk(0)rdisk(0)partition(1)\WINDOWS="Microsoft Windows XP Professional" /fastdetect 
    /noguiboot

              After restarting, the xp boot splash screen will be gone. If you want to enable the boot screen again , just remove the newly added switch from boot.ini. Upon restarting, the splash screen will be gone. It can be re-enabled by removing the new switch. Here is the path how to reach boot.ini

      Edit the Boot.ini File

      To view and edit the Boot.ini file:
      1. Right-click My Computer, and then click Properties.
        -or-
        Click Start, click Run, type sysdm.cpl, and then click OK.
      2. On the Advanced tab, click Settings under Startup and Recovery.
      3. Under System Startup, click Edit.


    Share/Bookmark

    Saturday, October 23, 2010

    Funny JavaScript tricks

    Hi frnz.. Today i am gonna tell you some interesting and funny JavaScript tricks and hacks.. to work those codes all you got to do is just copy the code and paste it into your browser address bar and hit "enter".

    Modify the page Data

    you can edit any web page as you can and also you can save the edited pages to your computer.Here is the code copy it and paste it into address bar ..


    javascript:document.body.contentEditable='true'; document.designMode='on'; void 0


    Play with images

    Here is a wonderful funny trick with this you can play with images in web page. Just copy paste this in any web page hit "enter" then all the images in that page starts rotating in circular fashion. Try it on page which contain more images.

    javascript:R=0; x1=.1; y1=.05; x2=.25; y2=.24; x3=1.6; y3=.24; x4=300; y4=200; x5=300; y5=200; DI=document.getElementsByTagName("img"); DIL=DI.length; function A(){for(i=0; i-DIL; i++){DIS=DI[ i ].style; DIS.position='absolute'; DIS.left=(Math.sin(R*x1+i*x2+x3)*x4+x5)+"px"; DIS.top=(Math.cos(R*y1+i*y2+y3)*y4+y5)+"px"}R++}setInterval('A()',5); void(0);

    Calculator

    If you don't want to use default calculator, if you want to try some thing different that your browser should do this bloody job for you try this..!


    javascript: alert(34343+3434-222);

    you can change the numbers in brackets and also you can do complex arithmetic calculations.

    Find spoof web sites

    There are times when you are not sure that the website that you are visiting is
    authentic. Use this code whenever in doubt :-


    javascript:alert("The actual URL is:\t\t" + location.protocol + "//" + location.hostname + "/" + "\nThe address URL is:\t\t" + location.href + "\n" + "\nIf the server names do not match, this may be a spoof.");

    Share/Bookmark

    Friday, October 22, 2010

    Why captcha

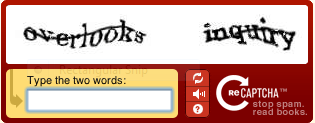
    you might be in thinking the a code is needed to be entered when we are signing up a new mail or in context where conformation is needed. The twisted letters some thing similar to below image are called CAPTCHA.


    what is a CAPTCHA?
      A captch is a program that which protects web sites form bots by generating and grading tests that only human can pass but not the current computer program. These can be read only by human being not by the robots.

              The term CAPTCHA (for Completely Automated Public Turing Test To Tell Computer and Humans Apart) was came in to picture in 2000 by Luis von Ahn, Manuel Blum, Nicholas Hopper and John Langford of Carnegie Mellon University.

    credits to captcha.net

    Captcha has several application for practical security: 

    1. preventing commenting spam in blogs
    2. protecting web sites registration
    3. Protecting Email Addresses From Scrapers
    4. Online Polls
    5. Preventing Dictionary Attacks
    6. Search Engine Bots
    7. Worms and Spam

    Share/Bookmark

    Install win-7 from USB

    You might be knowing how to install win-7 from USB/DVD by using DISKPART command in RUN. If you want to know this method visit this page.
    Here is a simple method how to install windows-7 from USB /DVD using a small tool called "Windows7-USB-DVD-too" provided by Microsoft.
    To install win-7 you need a ISO file in disk and a USB stick. If you downloaded an ISO file under programm MSDNAA or from any other ways.


    what you need: 

    • you need  ISO image of win-7 
    • A USB stick. (must use more than 2GB)            


    1. Download this tool from here
    2. prepare ISO file of win-7 using Nero or any iso creating software.
    3. Install it on your machine.
    4. In first step you need to choose the ISO file which you are created earlier click Next..
    follow the instructions here..This tool make your pen drive bootable. 

    Share/Bookmark

    Java advantages and Disadvantages

    Java is the famous programming language used world wide. Java is the hot property of SUN MICROSYSTEMS. JAVA is much similar to C++ and both dependent indirectly on the C. Because of it's simplicity Java is popular round the world. Java is ruling the computer world with it's features. Thanks to the god fathers of Java James Gosling, Patrick Naughton, Chris Warth, Ed Frank.


    Advantages:
    Java is simple: Java is simple because writing code, compiling, running, debugging,and even learning is also simple. A reason why Java is simple is automatic allocation/de-allocation of memory & garbage collection . where as in other languages like C++ programmer has to take care of allocating memory and also collecting the garbage . Java really made the programmers life simpler.

    Java is object-oriented: An object is a software bundle of related state and behavior. Java is object oriented because every thing is achieved on creating objects, manipulating objects and inter communication with objects. We can make our work done by these.

    Java is platform-independent: The most significant feature of Java is to move simply from one system to other and able to run. It is important for application to run on every machine in case of world wide applications. This is achieved by Java with Platform-independence. compiled code can run on any of the systems which consists of Java Runtime Environment.Java is platform independent both in source and binary levels.

    Java is distributed: Distributed computing has changed the entire computer world. Java supports full fledge to Distributed environment. It designed to made distributed computing easy.

    Java is Secure: The first language in the world which developed considering security as the part of it's development.The Java compiler catches more compile-time errors; other languages (like C++) will compile programs that produce unpredictable results.
    Java does not allocate direct pointers to memory. This makes it impossible to accidentally reference memory that belongs to other programs or the kernel.Java's security model is focused on protecting users from programs downloaded from sources across a network.

    Java is compiled and interpreted: Yes. Java is both compiled and interpreted. first the Java code is compiled with Javac compiler and so called .class or Byte Code is generated. This Byte Code is platform independent means can run on any Operating System. when Java application is started then the pre-compiled Java Byte Code interpreted using Java Virtual Machine.

    Java is Robust: Java is robust which mean reliable . Java puts lot of emphasis on early checking for errors. In other way Java is highly supported language, mean we can't crash our system by writing bad programs like c. more over it is robust because of its Automatic memory allocation and garbage collection, and strong type checking also help to Java being robust.

    Java is Multi threaded: Java supports multi threading. which means to perform different tasks in single program. A single program has capable of executing multiple threads(small sub code)simultaneously and continuously. which is necessary in gaming,network programming.

    Dis-advantages:
    performance: The main dis advantage of Java is it's performance. when compared to C or C++ Java may be simple, secure, robust but it is poor in performance because programs run in Virtual Machine. Java apps take not only more memory and also significantly time consuming. It feels slower on today's fast computers.

    platform specific features: Because Java program has to run on variety of systems across the world, features specific to one OS are not often implemented into Java programs, also the 'look and feel' of Java apps is completely different with default native systems apps of particular OS.

    Click here to know How to install Java and set the path
    Click here to download JAVA (JSE)
    Share/Bookmark

    Friday, October 1, 2010

    Reset IE settings

    Unable to browse from IE while you can browse from Mozilla Firefox.


    Hi frnz... If you are using  INTERNET EXPLORER 7 and 7+ a new feature is added ie: Reset Internet Explorer Settings. Due to spurious add-ons, incompatable browser extensions, spywares, and malwares your browser reaches to un-usable state. so that you can't browse from IE while you can browse in Mozilla Firefox.
    In such cases you need to bring browser to workable state.Internet Explorer 7 for Windows XP and 7+ in Windows Vista have many security enhancements which make Internet Explorer less susceptible to spyware and malware.

    we can bring Explorer to its previous state just by one click on RIES button.
    After RIES is run, the user will notice default settings of Home Pages, Search Scopes, Browsing History, Form Data, Passwords, Appearance Settings, Toolbars, and ActiveX controls.

    To invoke RIES form IE7 or 7+ go to Tools Menu, Internet Options, Advanced Tab and click on Reset… button.. If Internet Explorer is in a state where it cannot be started, one can get to RIES from Internet Options in Control Panel.


    After choosing Reset… from Internet Options, a confirmation dialog is displayed, warning the user about settings categories that will be reset during its operation
    click reset button to bring your Internet Explorer to workable state then restart the IE. Thats it you are done...!


    If you think it is useful to you....plz comment on post...whether it is use ful or not....if u have any doubts plz write in comment field .click on COMMENT to write. .....-u r's HARI
    Share/Bookmark

    Wednesday, September 22, 2010

    How to un-install Deep freeze

    To uninstall the software Deep Freeze must first be disabled and then uninstalled.

    To disable Deep Freeze:
    1. Hold down the shift key and double-click on the Deep Freeze icon. Alternatively, you can press Crtl-Alt-Shift-F6. You should now see a password dialog.

    2. Enter your password and click OK. If you have not yet entered a password you should be able to click OK without entering anything. You should now see a dialog with boot options.

    3. Select "Boot thawed" and click OK. This will disable Deep Freeze on the next reboot.

    4. Reboot your machine. After the machine reboots you are ready to uninstall Deep Freeze.


    To uninstall:

    1. Locate the installation file you used to install Deep Freeze to this machine. By default the name of this file is called "DF5Std.exe" for versions 5.X and "DF6Std.exe" for versions 6.X.

    2. Run the installation file (DF5Std.exe or DF6Std.exe).

    3. Select the option to "Uninstall"

    4. The software should uninstall and reboot the machine. When the machine reboots, Deep Freeze should be uninstalled.


    If u think it is use ful to you....plz comment on post...whether it is use ful or not....if u have any doughts plz write in comment field ......-u r's HARI
    Share/Bookmark

    Tuesday, September 14, 2010

    DIFFERENT WAYS TO SHUT DOWN PC

    Hi frnz.....we can shut down our pc in many ways...let's look at the different ways to shut down pc...!!!

    1.The first foremost way is a traditional way of shutting down the pc is going to start menu
    select shutdown button shutdown.


    2.we can get the shut down options by pressing shortcut key Alt + f4and select shutdown.


    3.The other way of shutting down the pc is creating the shortcut button. to create a short cut button for shutdown on the desktop is
    first right click on desktop
    choose new shortcut
    type the location of the button as
    "shutdown -s -t 00"
    where -s indicates shutdown, the -t indicates the time ie 00 then press next give name of the button (ie: shutdown)press ok and u r done....
    change icon as u wish.


    4.The other way of shutting down the pc is

    press win+R

    type shutdown -s -t 00 press enter u r done..


    5. press crtl + esc or win and press u 2 times.


    6. fastest methods:
    The fastest method for shutting down the method than any other methods is press ctrl+alt+del ( u will get windows task manager)
    click on shutdown hold ctrl key and click turn off.. pc wil be shutdown with in 2 seconds.


    7.another fast method is just press power botton on u r key board and leave u r pc to shut down.

    Share/Bookmark

    Wednesday, February 24, 2010

    How to install JDK on windows based system

    HOW TO INSTALL JDK 1.4 ON WINDOWS PLOTFORM

    Hi.....friends..........
    In this post i want to make you clear how to install jdk(java development kit)1.4 ...we often work on JAVA ...but most of us having confusion how to install JDK. Here i want to tell show you how to install it.

    Here i wanna discuss some basic things about JDK.. for novice programmers....
    • JDK stands for Java Development Kit which is a piece of software developed by SUN MICROSYSTEMS.
    • JDK is software which provides enverolment to Develop JAVA programms.
    • JDK =JVM+JRE

    (I will discuss much more about terms like JDK , JRE, JVM, JSE in my next post which are seems to be bit confusing for the novice programmer )


    STEPS TO INSTALL JDK 1.4:


    1. Download jdk here download jdk .

    2.Double click on downloaded .exe file. let the exe file to install....

    3.Now the steps begin to set path to java directory. go to Desktop->
    Mycomputer->right click->select properties.

    4. Select “Advanced” tab and then Environment variables. 
     
    5    Set class path in “system variables”   .....for that.......


    click new button........


    6. Type  below as it is in corrosponding Fields.....


    Variable name: classpath
         Value: <java directory>\lib\tools.jar; \lib\dt.jar;.;

         Example: If my java is installed in C:\java1.4
         My Value: will be C:\java1.5\lib\tools.jar;C:\java1.4\lib\dt.jar;.;

    Press OK....
    7.    Repeat STEP 5 and Type below as it is in corrosponding Fields.....


    Variable name: path
         Value : <java directory>\bin;

         Example: java1.4\bin;

    8. Repeat STEP 5 and enter below as it is in the corrosponding fields.....

    Variable name: JAVA_HOME
         Value : <java directory>

         Example: C:\j2sdk1.4.0_01;

    Hit OK... then again  OK......


    THAT'S ALL....... YOUR DONE....


    • TO CHECK WHETHER JDK IS INSTALLED PROPERLY OR NOT.........JUST FOLLOW THE BELOW STEPS.........
     STEP:1   START-> RUN-> type CMD-> ENTER

    STEP2: AT THE PROMPT ENTER JAVAC....IT WILL SHOW SOME POSSIBLE OPTIONS SCREEN EXACTLY LIKE BELOW.....WHICH MEANS JAVA IS INSTALLED PROPERLY..........


    Hope ..now you now perfectly how to install JDK1.4 ..The same method is applicable to all the versions of the JDK....

    think it is use ful to you....plz comment on post...whether it is use ful or not....if u have any doughts plz write in comment field ......-u r's HARI
    Share/Bookmark

    Monday, February 22, 2010

    How to install WINDOWS XP

    U must know it ...becoz.....
    • U bought new HDD but you dont know how to install OS in it why to call some one to do it???
    • U want to format your system...due to seveior virus attack...
    • You replaced your hard disk drive with a new hard disk drive that does not have Windows XP installed.
    • You purchased a computer without an operating system.
    Fortunately you do not need to be a computer export ...becoz...here is the complet help to install it..with screens... learn it and become export in installing OS.....

    TO INSTALL XP CHECK FOR FOLLOWING MUST WITH YOU::
    • You have the Windows XP CD.You have the product key available. The product key is located on your Windows XP CD case and is required to install and activate Windows XP.
    • Your computer must connectd with mouse, key-board, pre -installed cd/dvd drive in working condition
    • you must have xp drivers with you..
    • ( Drivers are software that Windows XP uses to communicate with your computer’s hardware)
    INSTALLATION PROCESS:
    Part 1: Begin the installation
    1.Insert the Windows XP CD into your computer and restart your computer.
    2.If prompted to start from the CD, press SPACEBAR.
    If you miss the prompt (it only appears for a few seconds),
    restart your computer to try again.


    3. Windows XP Setup begins. During this portion of setup,
    your mouse will not work, so you must use the keyboard.
    On the Welcome to Setup page, press ENTER.


    4. On the Windows XP Licensing Agreement page,
    read the licensing agreement.
    Press the PAGE DOWN key to scroll to the bottom of the agreement.
    Then press F8.


    5.This page enables you to select the hard disk drive on which Windows XP
    will be installed. Once you complete this step, all data on your hard disk drive
    will be removed and cannot be recovered. It is extremely important that
    you have a recent backup copy of your files before continuing.
    When you have a backup copy, press D, and then press L when prompted.
    This deletes your existing data.
    6.Press ENTER to select Unpartitioned space, which appears by default.


    7. Press ENTER again to select Format the partition using the NTFS file system,
    which appears by default.


    8.Windows XP erases your hard disk drive using a process called formatting and then
    copies the setup files. You can leave your computer and return in 20 to 30 minutes.


    9. Windows XP restarts and then continues with the installation process.
    From this point forward, you can use your mouse. Eventually,
    the Regional and Language Options page appears. Click Next to accept the
    default settings. If you are multilingual or prefer a language other than English,
    you can change language settings after setup is complete.


     10.On the Personalize Your Software page, type your name and your
    organization name.Some programs use this information to
    automatically fill in your name when required.
    Then, click Next.


    11. On the Your Product Key page, type your product key as it appears on your
    Windows XP CD case. The product key is unique for every Windows XP installation.
    Then, click Next.


    12. On the Computer Name and Administrator Password page, in the Computer
    name box, type a name that uniquely identifies your computer in your house, such as
    FAMILYROOM or TOMS. You cannot use spaces or punctuation. If you connect
    your computer to a network, you will use this computer name to find shared files and
    printers. Type a strong password that you can remember in the  
    Administrator password box, and then retype it in the Confirm password box.
    Write the password down and store it in a secure place. Click Next.


    13. On the Date and Time Settings page, set your computer’s clock.
    Then, click the Time Zone down arrow, and select your time zone. Click Next.


    14. Windows XP will spend about a minute configuring your computer.
    On the Networking Settings page, click Next.


    15.On the Workgroup or Computer Domain page, click Next.


    16.Windows XP will spend 20 or 30 minutes configuring your computer
    and will automatically restart when finished. When the Display Settings
    dialog appears, click OK.


    17.When the Monitor Settings dialog box appears, click OK.


    18.The final stage of setup begins. On the Welcome to Microsoft Windows page,
    click Next.


    19.On the Help protect your PC page,
    click Help protect my PC by turning on Automatic Updates now.
    Then, click Next.


    20.Windows XP will then check if you are connected to the Internet:
    If you are connected to the Internet, select the choice that describes
    your network connection on the Will this computer connect to the Internet directly, 
    or through a network? page. If you’re not sure, accept the default
    selection, and click Next.


    If you use dial-up Internet access, or if Windows XP cannot connect to the Internet,
    you can connect to the Internet after setup is complete.
    On the How will this computer connect to the Internet? page, click Skip.


    21.Windows XP Setup displays the Ready to activate Windows? page.
    If you are connected to the Internet, click Yes, and then click Next.
    If you are not yet connected to the Internet, click No,
    click Next, and then skip to step 24. After setup is complete,
    Windows XP will automatically
    remind you to
    activate and register your copy of Windows XP.


    22.On the Ready to register with Microsoft? page, click Yes, and then click Next.


    23.On the Collecting Registration Information page, complete the form. Then, click Next.


    24 On the Who will use this computer? page, type the name of each person who
    will use the computer. You can use first names only, nicknames, or full names.
    Then click Next. To add users after setup is complete or to specify a password to
    keep your account private, read Create and customize user accounts

    25.On the Thank you! page, click Finish.


    FOR MORE VISIT : www.microsoft.com

    Share/Bookmark